Basic Ecommerce Setup
For ecommerce setup, we have to make changes to the json, yml and Django Admin files for configurations.
Create OAuth Application for Ecommerce. Check if it already exists.
Log into LMS-URL/admin. This is the Django Admin panel.
From DJANGO OAUTH TOOLKIT, click Applications.

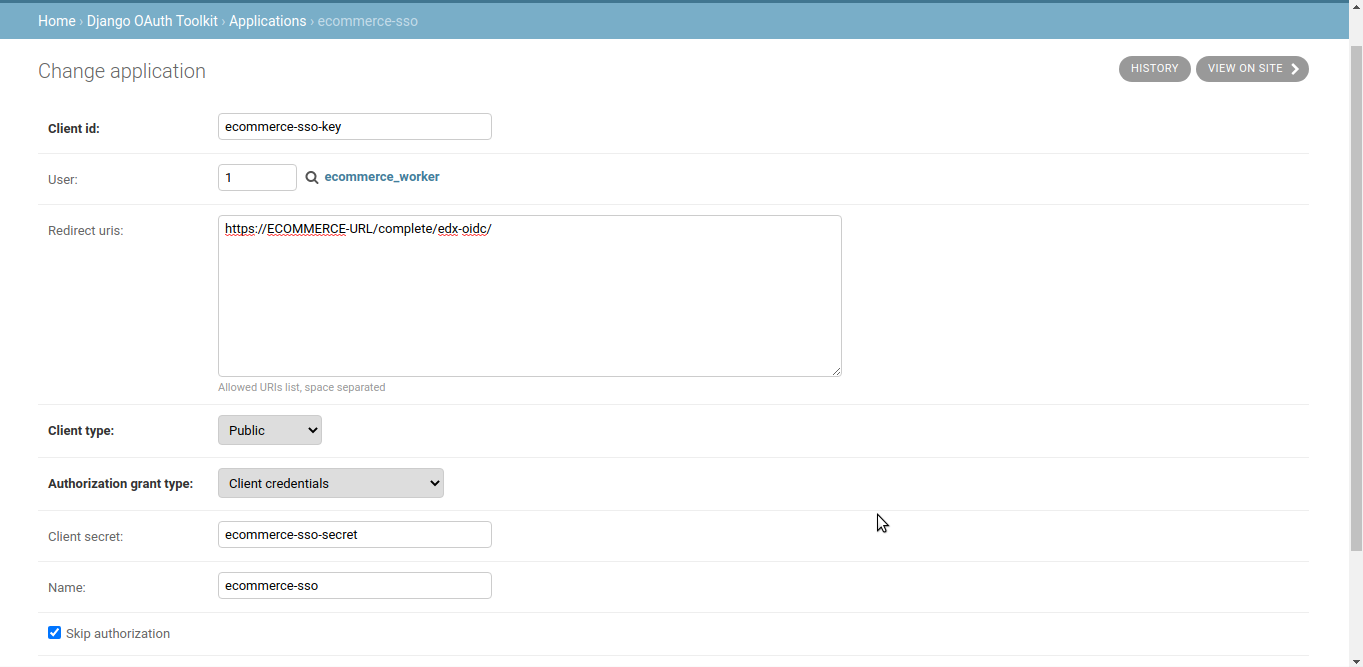
Add a Application by clicking button.

Fill form using appropriate values. It would auto generate Client id and Client secret, save these for later use. Check if it already exists.
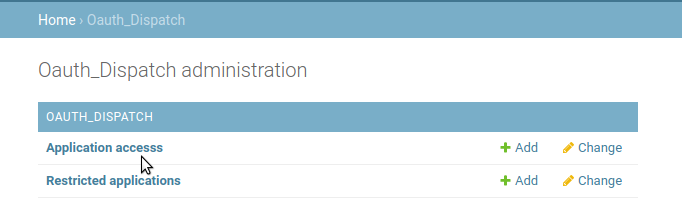
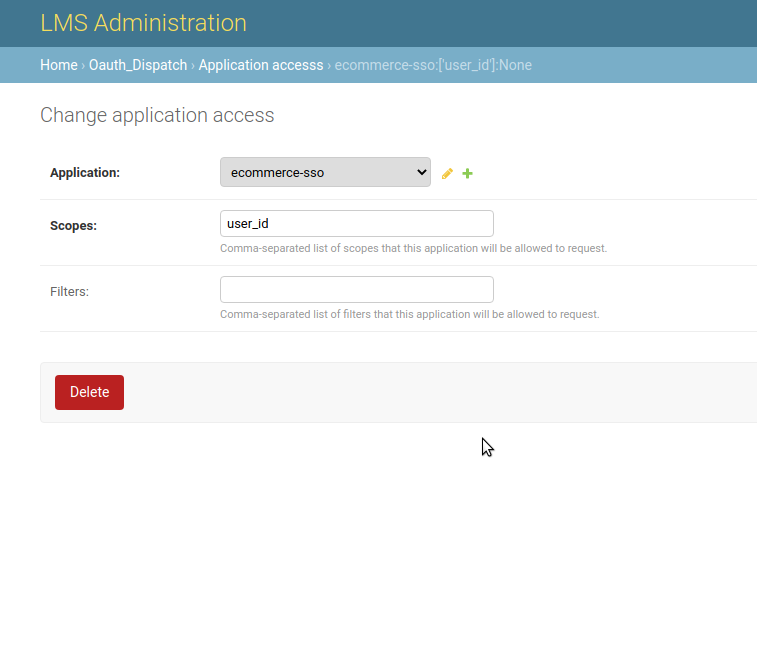
Create Application access for Discovery Service. Check if it already exists.
Log into LMS-URL/admin. This is the Django Admin panel.
From Oauth_Dispatch, click Application accesss.
Fill form using appropriate values. Check if it already exists.
Update keys in ecommerce.yml
Login to server from Ubuntu user (non edxapp user)
Go to /edx/etc (cd /edx/etc)
Open file ecommerce.yml to edit with sudo (sudo nano ecommerce.yml)
Update following keys
 SOCIAL_AUTH_EDX_OAUTH2_ISSUER: http://LMS-URL
 SOCIAL_AUTH_EDX_OAUTH2_KEY: Client Id obtained in step #1
 SOCIAL_AUTH_EDX_OAUTH2_LOGOUT_URL: http://LMS-URL/logout
 SOCIAL_AUTH_EDX_OAUTH2_SECRET: Client secret obtained in step #1
 SOCIAL_AUTH_EDX_OAUTH2_URL_ROOT: http://LMS-URL
 BACKEND_SERVICE_EDX_OAUTH2_PROVIDER_URL: http://LMS-URL/oauth2
 OAUTH2_USER_INFO_URL (under EDX_DRF_EXTENSIONS): http://LMS-URL/user_info
 ISSUER (under JWT_ISSUERS under JWT_AUTH): http://LMS-URL/oauth2
 ENTERPRISE_SERVICE_URL: http://LMS-URL/enterprise/
 ECOMMERCE_URL_ROOT: http://ECOMMERCE-URL
Update keys in ecomworker.yml
Login to server from Ubuntu user (non edxapp user)
Go to /edx/etc (cd /edx/etc)
Open file ecomworker.yml to edit with sudo (sudo nano ecomworker.yml)
Update following keys
ECOMMERCE_API_ROOT: http://ECOMMERCE-URL/api/v2/Save file
Update keys in lms.yml
Login to server
Switch to edxapp user with following command
sudo -H -u edxapp bashOpen file lms.yml to edit
nano /edx/etc/lms.ymlUpdate following keys
 ENABLE_OAUTH2_PROVIDER: true
 JWT_ISSUER (under JWT_AUTH): http://LMS-URL/oauth2
 ISSUER (Under JWT_ISSUERS under JWT_AUTH): http://LMS-URL/oauth2
 JWT_ISSUER: http://LMS-URL/oauth2
 ISSUER (under DEFAULT_JWT_ISSUER): http://LMS-URL/oauth2
 ECOMMERCE_API_URL: http://ECOMMERCE-URL/api/v2
 ECOMMERCE_PUBLIC_URL_ROOT: http://ECOMMERCE-URL
 OAUTH_ENFORCE_SECURE: false (true if using HTTPS)
 ISSUER (under DEFAULT_JWT_ISSUER): http://LMS-URL/oauth2
Restart all edx services with following command:
sudo /edx/bin/supervisorctl restart allCreate indexes in discovery service
Login to server from Ubuntu user (non edxapp user) and use the following commands
 sudo -H -u discovery bash
 source ~/discovery_env
 cd ~/discovery
 python manage.py install_es_indexes
Create Site and Super User in Ecommerce
Login to server from Ubuntu user (non edxapp user) and use the following commands
 sudo su ecommerce -s /bin/bash
 cd ~/ecommerce
 source ../ecommerce_env
 python manage.py makemigrations
 python manage.py migrate
 python manage.py create_or_update_site --site-id=1 --site-domain=ECOMMERCE-URL --partner-code=edX --partner-name='OpenedX' --lms-url-root=http://LMS-URL --payment-processors=cybersource,paypal --backend-service-client-id=ecommerce-backend-service-key --backend-service-client-secret=ecommerce-backend-service-secret --sso-client-id=Ecommerce OAuth Client Id --sso-client-secret=Ecommerce OAuth Client Secret --from-email= Any-Email-Address --discovery_api_url= http://DISCOVERY-URL/api/v1/
 **Note:** In above command, please do not change values of backend-service-client-id and backend-service-client-secret keys. partner-code and partner--name should be set to short code and name of partner created in discovery setup.
After the above command has finished, then create super user for ecommerce service using following command:
python manage.py createsuperuser Note: When ask for username, email and password, enter the username, email and password and note down credentials
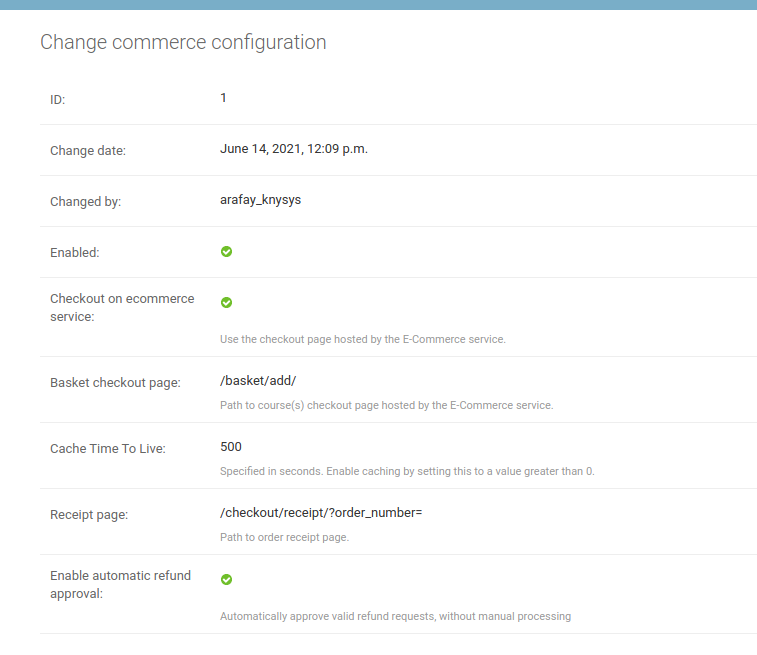
Create Ecommerce Configuration from LMS Admin panel
- Login to LMS with Super User (user who has staff and super user rights) account
- Go to http://LMS-URL/admin/commerce/commerceconfiguration/
- Click on Add
- Fill information as shown in following screenshot
Retrieve data from Discovery Service
 Login to server from Ubuntu user (non edxapp user)
 sudo -H -u discovery bash
 source ~/discovery_env
 cd ~/discovery
 python manage.py refresh_course_metadata --partner_code Partner_code
 **Note:** Replace Partner_code with code of partner created.
 python manage.py update_index --disable-change-limit
Save file and restart all edx services with following command:
sudo /edx/bin/supervisorctl restart all
Create course in Ecommerce
Before creating a course in Ecommerce, please make sure that you fill all information of your course (Course Dates, Title, Description and Image etc). Now follow these steps:
- Login to LMS with user which has staff and super user rights
- Go to http://LMS-URL/admin/auth/user/
- From list of user, find ecommerce_worker and click on it to open detail view
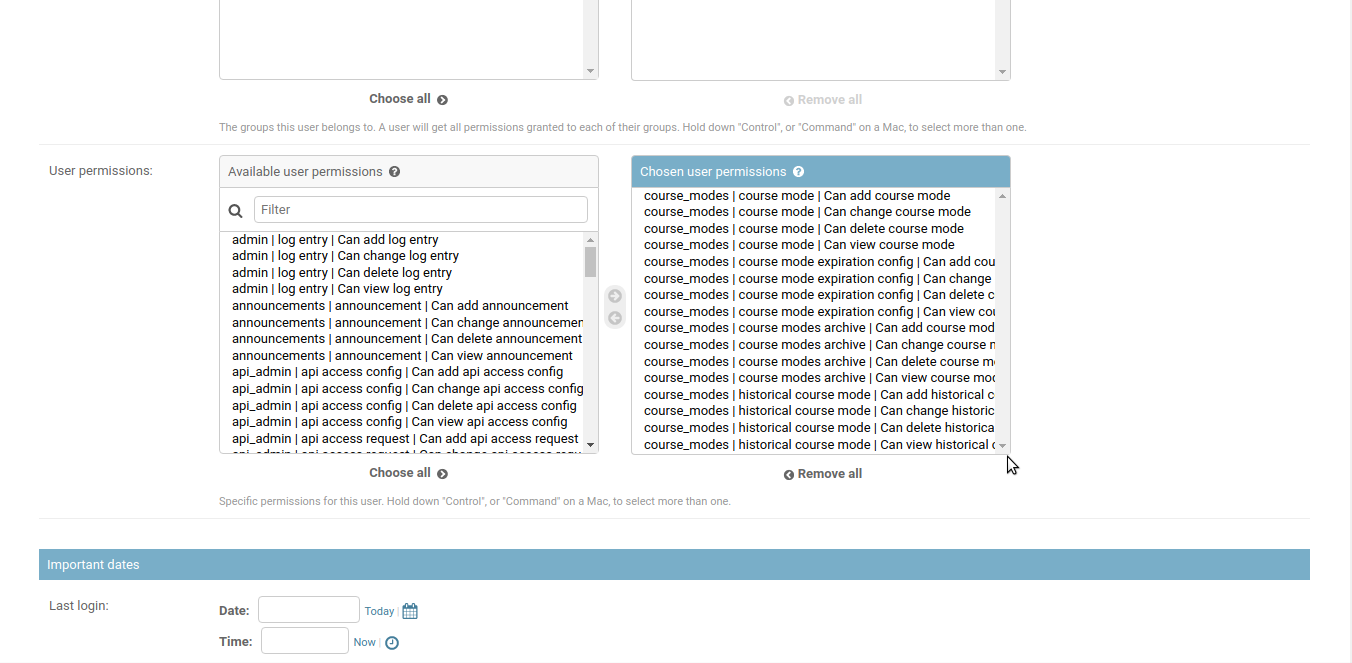
- Scroll down to find User permissions in user detail view
- From Available user permissions assign course_modes permission.
Now scroll down to find User Profile section
In the Name field, type username of super user of LMS as shown in following screenshot
Now scroll down to bottom of user detail view and click on Save button
Now go to Go to http://ECOMMERCE-URL, user will be redirected to LMS dashboard instead of Ecommerce dashboard. This is because LMS users do not have same rights and permission on Ecommerce
To fix this, SSH into server from Ubuntu user (non edxapp user)
 sudo su ecommerce -s /bin/bash
 cd ~/ecommerce
 source ../ecommerce_env
 python manage.py shell -c "from django.contrib.auth import get_user_model; get_user_model().objects.filter(email='LMS_SUPER_USER_EMAIL ’’).update(is_staff=True, is_superuser=True)"

 **Example Command:** python /manage.py shell -c "from django.contrib.auth import get_user_model; get_user_model().objects.filter(email='test@user.com').update(is_staff=True, is_superuser=True)"
Now go to http://ECOMMERCE-URL , and user will be redirected to Ecommerce dashboard
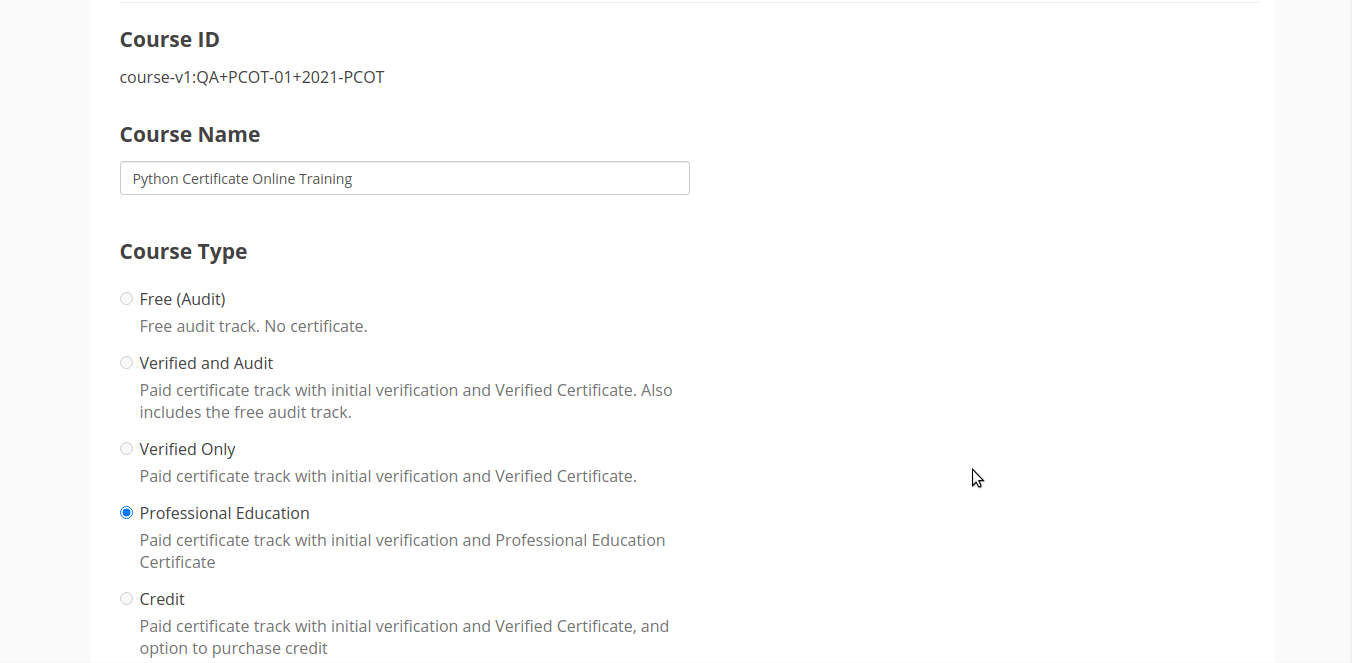
Now to create course, go to http://ECOMMERCE-URL/courses
Click on Add New Course
For Course ID, enter Course ID of a course in your Open edX instance. For example, course-v1:edx+cs101+2020_t3
For Course Name, enter name for your course
For course type, select Professional Education
Click On Create Course button. For reference screenshot is attached below:
If using Sub-Domain then configure sub domain and perform DNS configuration for ecommerce.domain_name (This is optional step, if not configuring this, you can use the notes api through port.)
Perform nginx configuration in /etc/nginx/sites-enabled/ecommerce (If your site is using subdomain)
Update the listen port from 18380 to 80.
listen 80;Issue SSL certificates for sub domain. (If your site is using subdomain and SSL is enabled.)
 sudo certbot -d LMS-URL.com,studio.LMS-URL.com,notes.LMS-URL.com,discovery.LMS-URL.com,ecommerce.LMS-URL.com --expand
 sudo service nginx restart
Update all discovery URLs to use sub domian in lms.yml, studio.yml, ecommerce.yml
 sudo nano /edx/etc/lms.yml
 sudo nano /edx/etc/studio.yml
 sudo nano /edx/etc/ecommerce.yml
Save file and restart all edx services with following command:
sudo /edx/bin/supervisorctl restart all