Setup Comprehensive Theming
Enabling Theme
Before adding a theme, you need to enable it. The files you will be modifying is lms.yml and studio.yml.
For LMS and Studio that you want to theme, set the "ENABLE_COMPREHENSIVE_THEMING" configuration property to true in the lms.yml and studio.yml.
After that set the "COMPREHENSIVE_THEME_DIRS" configuration property to the path "/edx/app/edxapp/themes". Make sure the path exists, otherwise create the path.
Optionally, you can set the "DEFAULT_SITE_THEME" configuration property to the theme folder name (eg: new-theme).
Restart the LMS and Studio for the changes to take effect.
Adding a Theme
On the application server, copy an existing theme into your /edx/app/edxapp/themes directory. If necessary, rename the folder the name of your new theme (e.g. new-theme)
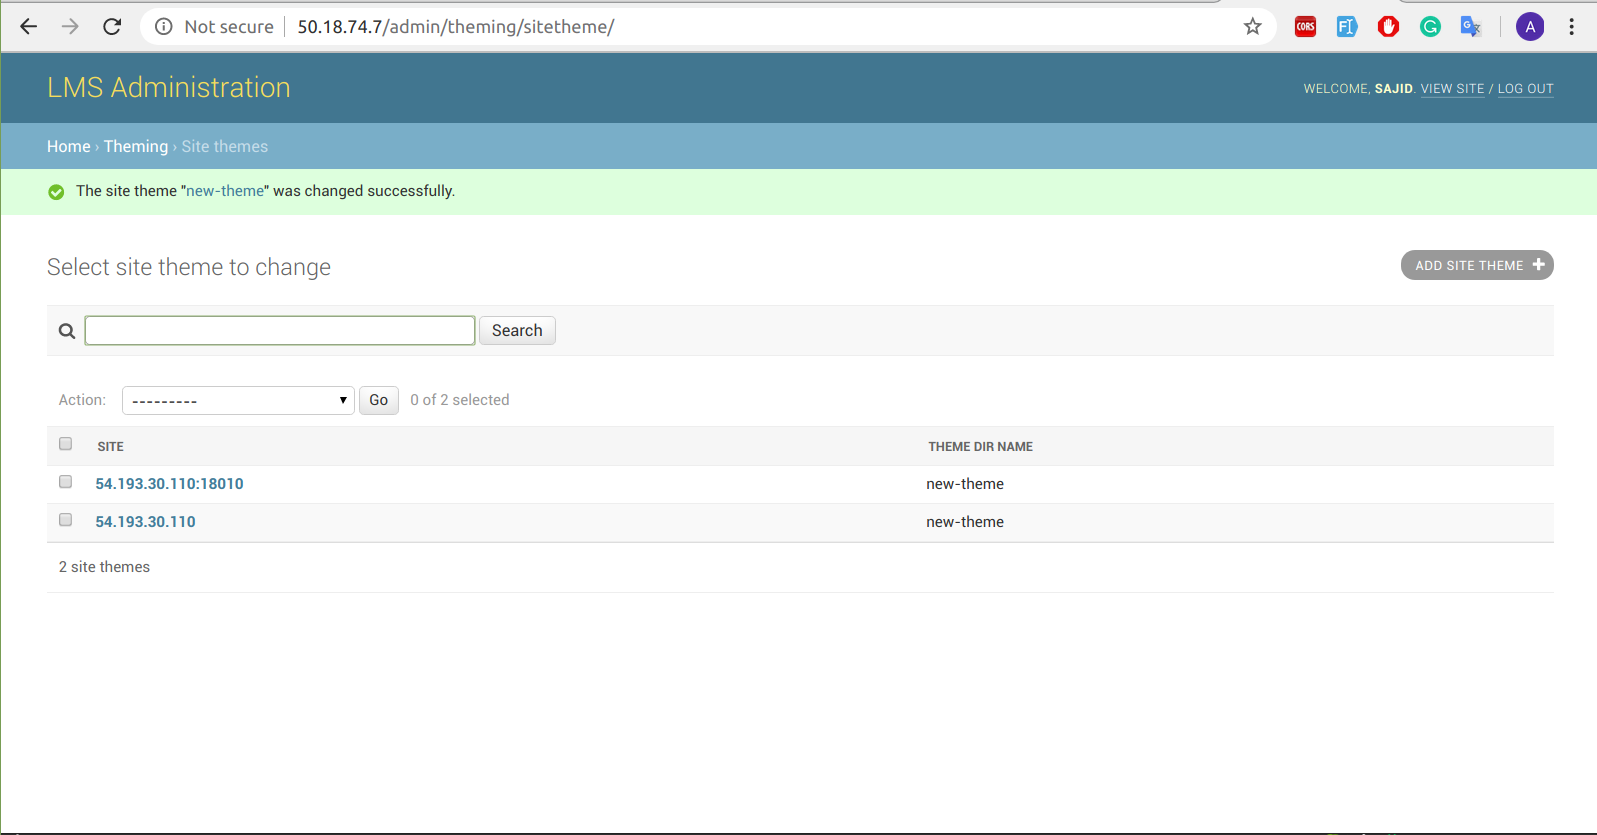
Log into the Django admin dashboard (/admin). Navigate to Theming > Site Themes.
Select "Add Site Theme" and select the site name from the dropdown and enter theme name. Theme name must match the name of your new theme folder (e.g. new-theme). The sitename of LMS and Studio can be the IPs or domain names.
The new-theme should contain the similar hierarchy as defined in edx-platform core directory. That is, it must contain lms and cms folders on base level. If these hierarchies or files do not exist, then you can create one or copy them.
After changing in the files which could be .js and .sass, you need to run paver command inorder to compile the asset. HTML file changes do not require to run this command.
paver update_assets lms cms --settings=production
Modify an HTML page
All the HTML files are placed in templates folder inside lms or cms directory. You need to find out the file that is related to the rendering of that view. For instance, if you wanted to add an about page in LMS. In this scenario, about.html page is the concerned file.
Copy the about.html file from edx-platform core directory to new-theme directory.
cp lms/templates/static_templates/about.html /edx/app/edxapp/themes/new-theme/lms/templates/static_templates/After modification in the about.html file according to your own requirement, refresh the /about webpage and you would see the changes you have made.
Modify the SASS
Usually, we write sass files which has .scss extension rather than css files because sass compiles into css. Most of the styling in the LMS comes from the lms/static/sass/lms-main-v1.scss while other .scss files are prefixed with underscore ‘_’ imported in it. So, before making any scss related changes to style property of HTML elements, copy some files from edx-platform core directory to new-theme directory.
cp lms/static/sass/lms-main-v1.scss /edx/app/edxapp/themes/new-theme/lms/static/sass/
cp lms/static/sass/_build-lms-v1.scss /edx/app/edxapp/themes/new-theme/lms/static/sass/
Modify existing style property
So, to modify existing style property, you need to first identify from which file the class or id has been called which is responsible for the element appearance. For instance, about.html page UI has been defined in _about_pages.scss.
Copy the _about_pages.scss file from edx-platform core directory to new-theme directory.
cp lms/static/sass/multicourse/_about_pages.scss /edx/app/edxapp/themes/new-theme/lms/static/sass/multicourse/After modification in the style properties in _about_pages.scss, run the paver command to compile into css. This command will take some time but you can reduce the compilation time by running paver only for LMS or Studio specifically.
paver update_assets lms --settings=production     # for LMS
paver update_assets cms --settings=production     # for Studio
Create new style property
In this approach, you can define your own sass file and implement css properties in it.
If you want to define styling of an element from scratch, add id or class onto that HTML element.
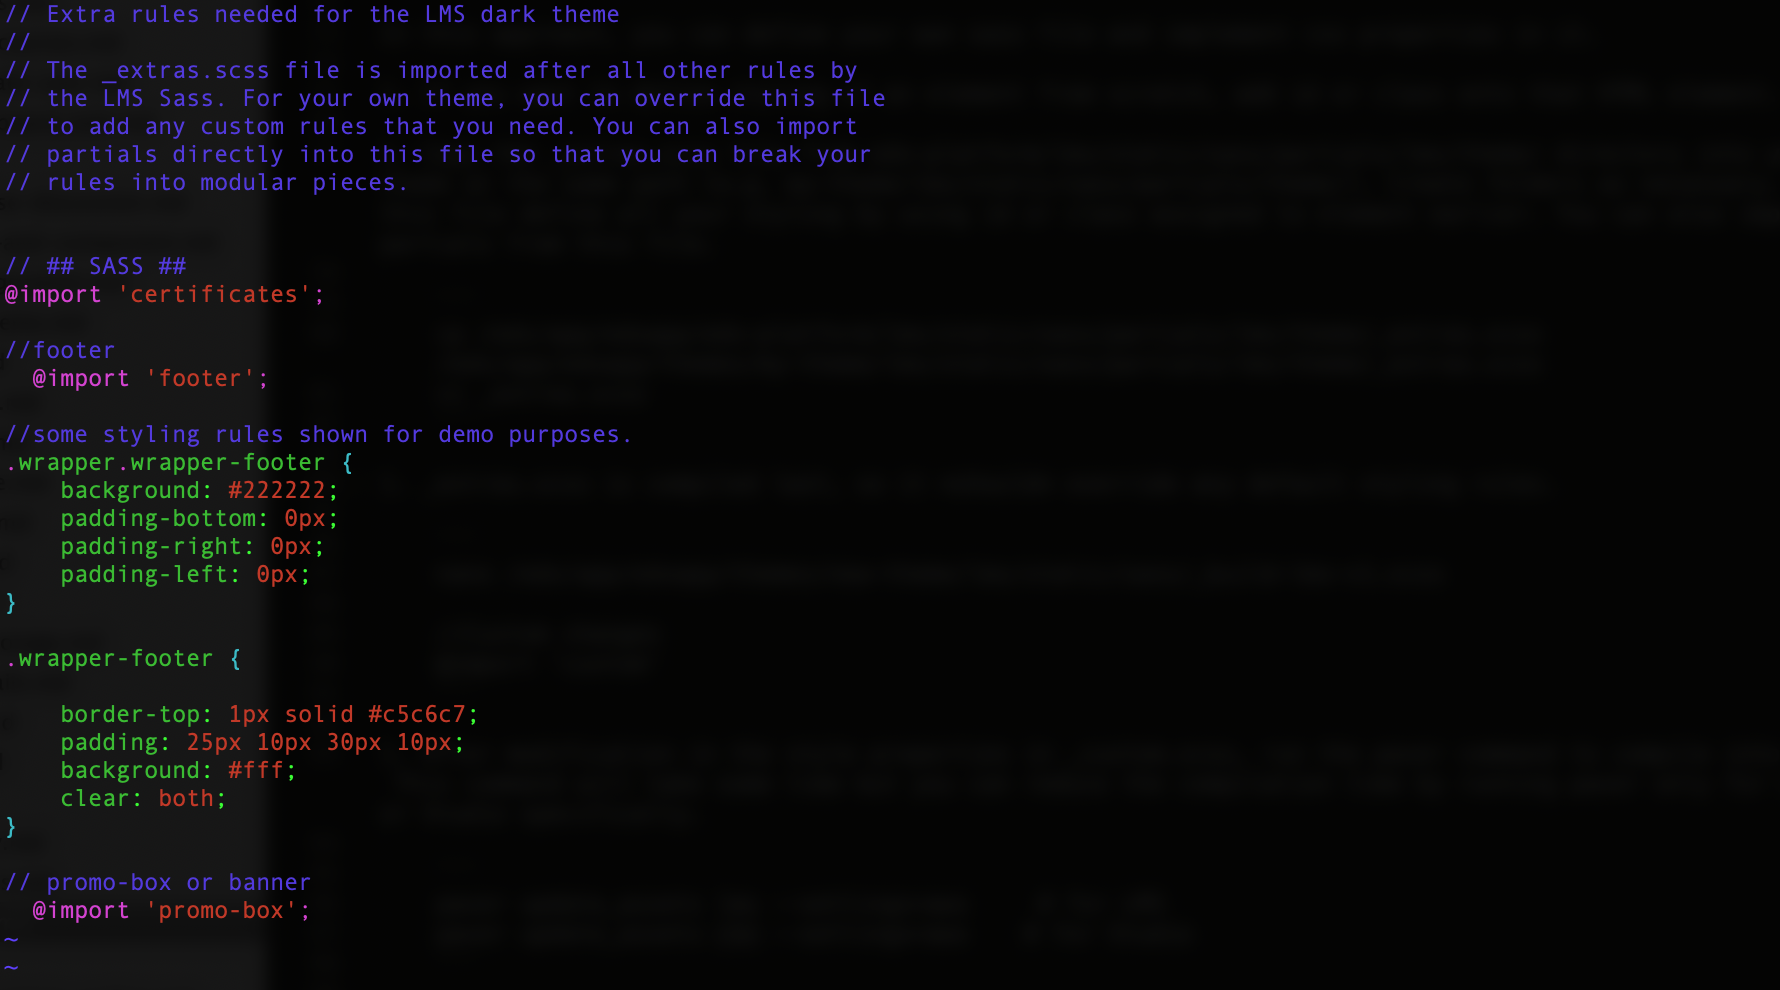
Copy the _extras.scss file from edx-platform/lms/static/sass/partials/lms/theme/ directory into your theme at the same path (e.g. my-theme/lms/static/sass/partials/theme/). Create folders as necessary. In this file define all your styling by using id or class assigned to element earlier. You can also import partials from this file.
cp /edx/app/edxapp/edx-platform/lms/static/sass/partials/lms/theme/_extras.scss /edx/app/edxapp/themes/my-theme/lms/static/sass/partials/lms/theme/_extras.scss
vi _extras.scss
_extras.scss is compiled last, so it should override any default styling rules. Modify your _extras.scss file. It might look something like this:
After modification in the _extras.scss file, run the paver command to compile into css. This command will take some time but you can reduce the compilation time by running paver only for LMS or Studio specifically.
paver update_assets lms --settings=aws     # for LMS
paver update_assets cms --settings=aws    # for Studio
Modify JavaScript (JS)
Customization of JavaScript files is a tricky task in LMS and Studio as there is no particular defined way. So, the only and quick way around is to directly work on the edx-platform core directory of JS. The core directory of JS is located at lms/static/js. Once identified which file to work on, then you need to only modify the concerned JS file and run paver command to compile the JS assets.
For instance, the username field of the registration form in the registration page needs to be readonly and will be filled by the value of the email field. In this scenario, the concerned JS file to work on is RegisterView.js.
nano lms/static/js/student_account/views/RegisterView.js

$('#register-email').change(UpdateInfo)
function UpdateInfo()
{
    var email = $('#register-email').val();
    var username = email;
    $('#register-username').val(username);

}

$('#register-username').prop('readonly', true);
$('#register-username').css('background-color', '#DEDEDE');
$('#register-username').attr('maxlength', '60');

return this;
Now that you have modified RegisterView.js and included code which does the task. It's time to run paver command to compile JS assets.
paver update_assets lms --settings=aws     # for LMS
paver update_assets cms --settings=aws    # for Studio
Modify certificates
Certificates are generally a mechanism used to identify that a learner has passed the course. Customization of certificates depends on HTML assets located in lms/templates/certificates and SASS assets located in lms/static/certificates/sass of edx-platform core directory. Modifying these assets works in a similar way of Modify an HTML page and Modify the SASS.
HTML related modifications
The main HTML file is valid.html in which other files has been included namely _accomplishment-introduction.html and _accomplishment-rendering.html. Before any modification, these files need to be copied from edx-platform core directory to new-theme templates directory. For your simplicity, you can copy the entire certificates folder in one go.
cp -r lms/templates/certificates /edx/app/edxapp/themes/new-theme/lms/templates/
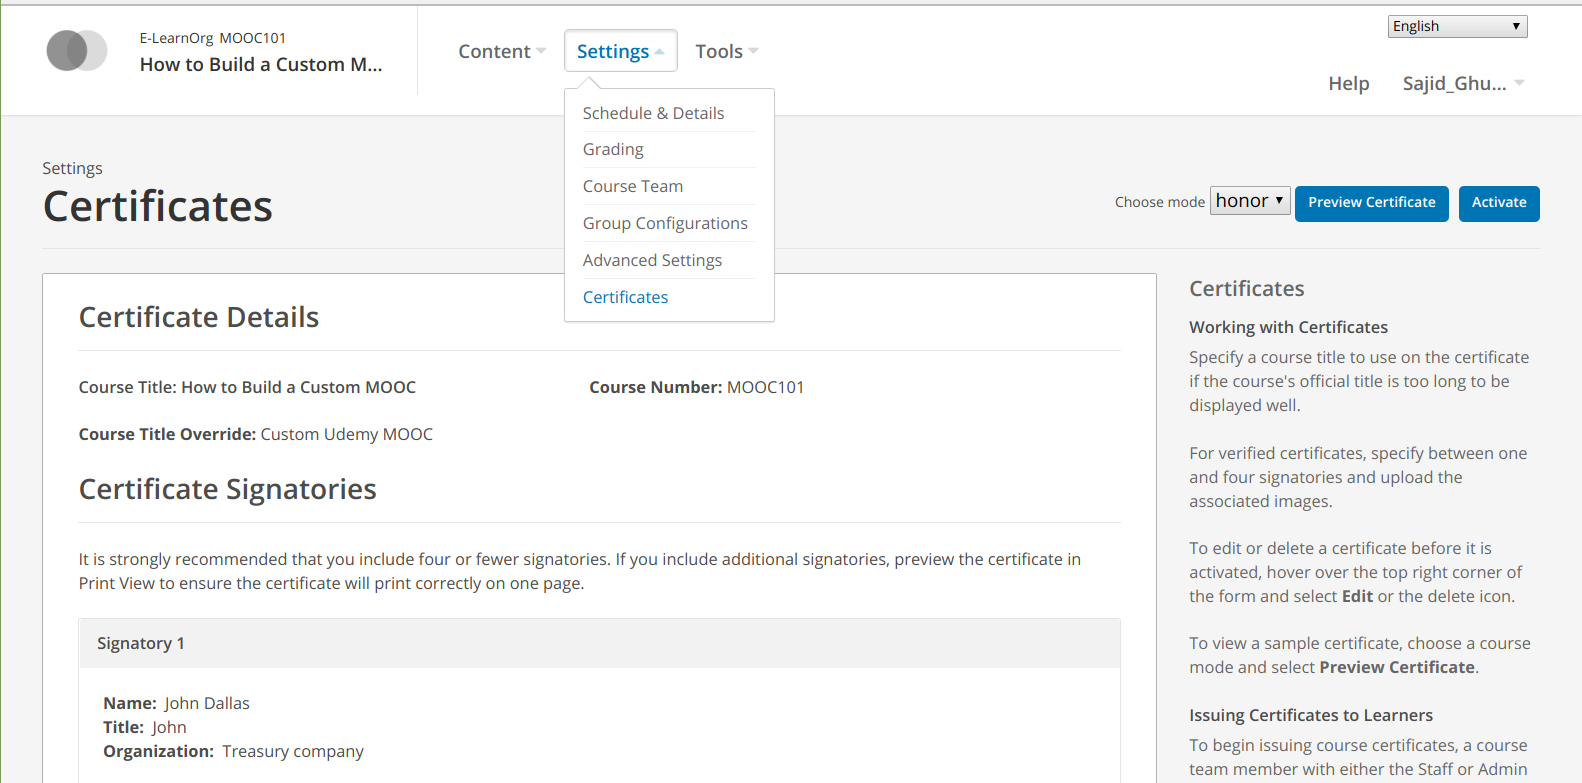
Now make modifications in the template/html files according to the requirements in the new-theme certificate directory and “Preview Certificate” in the certificate section of a course’s settings.
SASS related modifications
The sass files of certificates are located at lms/static/certificates/sass. But here we follow an unconventional approach rather than conventional one. The conventional approach includes overriding the path of the sass files, copying the required sass files, modifying the sass files and compiling the sass files using paver command.
However, in an unconventional approach you directly write CSS in HTML files of certificates. The reason for using this unconventional approach is that it has been observed that certificates sass assets do not compile with paver command. Before continuing to this approach, you should have a basic understanding of HTML related modifications.
For instance, if you want to change the color of title of the recipient in the certificate. Then append a CSS block, add a style tag and modify the CSS property in the concerned HTML file which is _accomplishment-rendering.html.
nano /edx/app/edxapp/themes/new-theme/lms/templates/_accomplishment-rendering.html

<%block name="css_extra">
  <style>
    .accomplishment-recipient {
       color: green;
     }
  </style>
</%block>